Sunday, 24 May 2020

42 - Arachnophobia

A while ago I picked up half a dozen contrast paints from Games Workshop.  I have tried several times to incorporate them into my painting style.  I have had some marginal success with Basilicanum Grey when painting blacks.  However I have never really been happy with how it turned out.

So I figured that I would give them a proper try.  I grabbed some of the various spiders from the Harry Potter and the Chamber of Secrets game.  I primed them and then used the airbrush to give them a solid coat of white.  I tried two different coloured spiders, grey and brown.


I used Basilicanum Grey and Skeleton Horde.  I don't know if it was just these two particular paints but the colour was very weak after a single coat.  I ended up having to do three coats to get a rich colour.  The brown was the weaker one even after multiple coats so I added a wash of Scale Colour Inktense wood to it.

I am happy with how the spiders turned out in the end for the amount of time I spent on them.  It is always good to have a handful of spider models ready to go for various RPG games.  However I am still not sold on contrast paints.  I can definitely see their value, I just have not been able to incorporate them successfully into my style.  I feel that I was probably just not using the correct contract paints to achieve the effect I was looking for. 

Kevin


Monday, 18 May 2020

27 - Can't See the Forest for the Trees

I got some colour blocking done on White Buffalo...but then my hobby ADD kicked in and I started to work on some new terrain.

I had a bag of pine trees in the basement.  I wanted to made a few stands of trees to use in Wild West Exodus and in some upcoming RPG sessions.  The trees needed to be removable in order to fit models within the area terrain though.  It makes the terrain much more functional in games.

So I found some old tree trunks in my bits box to have the trees stand in.  While I was in there I also found some bits to liven up the bases.

I added the trunks to some old bases and glued the bases to a several discs of scrap wood.  I then used some caulking to make a smooth transition from the bases to the wood.  I also used the caulking to help blend in the bits (barrels, grave, way marker, fence, statue).


I am really happy how these turned out.  I have a fun Through the Breach scenario that I will use these with the old Prospectors shack that I painted last week.

While working on this I also got an idea for another piece of area terrain, a run down frontier graveyard.

Kevin

Wednesday, 13 May 2020

24 - Old Prospectors Shack and Outhouse

I did not get much painting done over the last week and a half.  I spend most of my hobby time playing through the solo DnD campaign with my Hawkeye character that I painted up last week.

The solo campaign was alot of fun.  It played like the old Steve Jackson and Ian Livingstone books I read as a kid.  You get to a section, it tells you the scenario and then lays out some common options that you can do.  You then click on the option your character would do and it takes you to another section.  So not a true DnD experience but still a lot of fun in the meantime. 

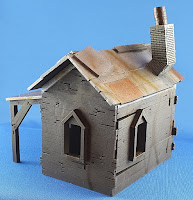
I did do some work on a little more Wild West Exodus terrain.  I painted up the old shack and the outhouse.  Again I did this project mainly to practicing my airbrush skills.  This time I did the wood base colours with the airbrush then used some grays to dry-brush a old weathered look.  I then switch back to the airbrush for the metal roof and weathering.  I was quite happy with the result and the amount of time it took to do.  I also got inspired for a fun little Through the Breach scenario to use it in.


I wanted to spruce up the interior a bit too.  I made a quick floor out of some coffee stir sticks.  I then made a quick (very quick fireplace) out of some scrap foam I had laying around.  This was also a bit experimental as I was seeing how well a green-stuff textured rolling pin would work on a piece of foam.  Detail is not deep, but it will work in a pinch.  I then made some picture frames using some more coffee stir sticks.  For the actual pictures I found some nice nature photos in an old hiking magazine and cut them out.


I also painted up the outhouse, which was just fun.  Should also be a laugh to put this on the table for both DnD/Through the Breach and Wild West Exodus. 


I am going to continue work on White Buffalo now and then some random monsters to use in some RPG games I am hoping to play in the future.

Kevin

Sunday, 3 May 2020

22 - Hawkeye

This week I continued with "paint whatever I feel like painting", as opposed to "paint something I need to get done for a game".

After painting up that Wild West Exodus building last week, I has been eyeing my unpainted Wild West Exodus models.  My original plan was to try painting one of the outlaw motorcycles in Non-metallic metallic.  However I thought painting a model where 90% of it was going to be NMM might be a bit ambitious for a first attempt at the technique.

So I decided to work on Hawkeye from the Warrior Nation instead.  This is a beautiful sculpt.  I started out by adding a bow string to the model as well as and arrow.  The arrow is a tad to large for the model though (it was what I had on hand).

The biggest problem I had with this model was the different shades of brown.  I wanted to use a lot of brown and beige on the model to represent the leather and animal skins.  The problem I had was that I only had so many shades of brown to work with.  I had to try out different combinations of what I had on hand.  The bow colour was the hardest, but it also turned out to be one of my favorite parts of the model.


I also tried painting some Non-metallic steal and gold for the first time.  I did the arrow head, hoop on her hair and the knife blade in the NM-steal.  I then painted the bands on the bow, the hilt of the knife, her necklaces and some discs on the quiver in the gold.  I followed the Scale Color 75 method for both.  It turned out not bad, but I definitely need more practice.  I struggle with visualizing light sources, and that is a key component to making NMM really work.


I am looking forward to use Hawkeye in a game of Dungeons and Dragons until I can get in a game of WWE.  I friend of mine recommended a solo DnD adventure that I downloaded called "The Death Knights Squire".  I started to play through it the other night, and it is a lot of fun.  Reminds me of the old Fighting Fantasy choose your own adventure novels I grew up on.

Not sure what's up next on my painting table.  I might work on White Buffalo from the Warrior Nation or some more WWE buildings.  Or maybe both.

Kevin

Sunday, 26 April 2020

21 - Laying the Foundations

I pivoted a bit this week after working on those larger busts.  I started work on another larger scale figure and broke out the airbrush for it.  I am not great with my airbrush yet.  I am still getting used to the proper mixing ratios and brush control.  So I figured that since I had the airbrush out I might as well practice on something even larger. 

I had some Wild West Exodus terrain that I had primed up, so I picked out one of the buildings.  I really love the terrain from Warcradle,  It is a great combination of classic western with a modern/sci-fi twist.  I also like that the buildings roofs are removable and the interiors are partially finished. 

I chose the Jail to work on.  I grabbed some random browns (mainly older browns that I don't usually use, so if I mess up I don't mind wasting them), and just started to play around with the airbrush.


I was really happy with how the wood turned out. I then did all the metal and details with a brush.  I was trying out a new set of paints for the metals, namely the Metalsmtih paints.  These paints you have to mix your own metallic's to get a bunch of different results.  They worked well, but in retrospect they would have worked better through the airbrush I think (you can see a lot of the brush strokes).  I will try it out on the next one.


Same went with the interior walls.  I should have painted them with the airbrush to get a smoother transition.  It would have taken longer as I would have to have had to do a lot of taping and blocking to ensure that I don't over spray.


To finish off the piece I added some rust to the metal using some brown and orange paint mixed with baking soda.  I then found some Red Dead Redemption 2 wanted posters, shrunk them down and printed them out for the walls.   

Kevin


Sunday, 19 April 2020

20 - "Meats Back on the Menu Boys"

I have been working on some non-game related project recently.  It has been very rewarding but also very challenging at the same time.  I started to finish up a late Christmas present for a friend of mine and was able to complete it early in the week.  Once I get the plinth made I will take some pictures.

With the first big project done I moved on to my second attempt at painting a bust.  I picked up this Orc last year at the "Sword and Brush" event.  It is produced by a local company, Mollie's Miniatures.  It is a good sculpt, and a great price.  It was the perfect starting point for trying to paint something other then a miniature for the table top.  I highly recommend them if you are looking for something new to paint.

I had an idea late one night to paint this model up like an Uruk Hai from the Lord of the Rings movies.  These are the big nasty orcs that work for Saurman.  I felt comfortable painting up the reddish/brown skin and it gave me the opportunity to try and freehand paint the white hand symbol.

The area on the area on the model that gave me the most problems was the hair and the beard.  I wanted a dirty grey/black colour.  I made two attempts at it but could not quite get it were I wanted it.  I added a chestnut glazes  at the end that helped (and helped tie it into the skin).


I also tried to make a plinth for this model.  This was my first attempt.  I used some scrap pine I had in the garage.  I think I made it a little too big for this particular bust.  I also have to spend more.time sanding it down and applying the varnish.  All in all I am happy with the first attempt.

Kevin

Saturday, 4 April 2020

19 - Who's a Good Boy?

To continue with my Through the Breach campaign prepping,  I got a few more models painted earlier this week.  I needed some smaller robot minions.  I remembered the nice attack dogs from Wild West Exodus that I had built up a while ago. 

I followed the steps for both silver and gold in the Scale 75 "Steampunk in Miniature" book.  I really liked how the gold turned out.  They were basically a trial run for how I was going to try and paint gold on a current larger project.  I was quite happy with the results.

I tried to add some glowing eyes to the dogs, it did not turn out great.  I think I need to do some more research on how to accomplish this technique. 


I have a couple of busts on the go right now.  They are proving to be a lot of fun to paint.   

Kevin