Saturday, 19 November 2016

T34s

T34

I picked up a copy of the “Tanks!” game by Gale Force 9 and Battlefront Miniatures last week.  I really enjoy painting Flames of War tanks and I have a good collection of them.  “Tanks!” seemed like a really good idea.

The game is very simple and quick.  It plays a lot like X-wing or Star Trek Attack Wing. The stat line, upgrades, critical damage and turn flow is virtually the same.  The main difference is the movement, which is simplified. 

I ran through an intro game with a few friends.  We used the suggested encounter battle in the rulebook; 2 American 75mm Shermans vs 1 German Panther commanded by Barkmann.   The guys (who were not miniature gamers) picked up the rules very quickly and after a turn or two did not need me to run very much. 

The game started off very well for the Germans (Panthers are tough as nails!).  All though some “hot” and “cold” dice did come into play (The Americans did not role over a 4 on 15 dice).  The Germans won in the end, but it was a lot closer than expected. 

I found the game had a lot of very dramatic points.  In “Tanks” if you tank is reduced to 0 hull points, you still get to complete the round before you are destroyed (which includes taking one last shot if you had not already done so that round).  As one of the Shermans lost its last hull point, it took one final shot at the Panther.  The shot penetrated the German armour with a critical hit, taking off half of its hull points.

I can’t wait to play again!  In the mean time I figured I would work on some new tanks for the game.  I had some Soviet T34’s lying around, so there was my next project.

The T34 was the most produced tank in WW2; 84 000 were built.  It is arguably one of the most influential tanks ever created.  It was also became the base model that many future tanks were built on.   

The Soviet medium tank was very effective in the early 40s.  It had good slopping armour, a 76.2mm cannon, a reliable diesel engine, and wide tracks.  The combinations of an engine that ran in cold weather and wide tracks made the T34 able to move very well over the “rasputitsa” (sea of mud).  The Germans by comparison had a very difficult time moving their tanks during the soviet “wet months”.  By 1944 many T34s had several upgrades including a larger turret and a more powerful cannon to deal with new German Armour.  These became known as the T43/85 (for the 85mm cannon it now had). 

The soviets were able to mass produce the T34 which allowed them to field large numbers to overwhelm their opponents.  The T34 was such a successful tank that it was still in use in many countries up until the end of the 1980s.      

Thursday, 10 November 2016

M10 17pdr

It has been a great and busy few months; family, wedding, honeymoon.  However as life starts to settle down again, I have been able to pick up a brush again.

This time last year I attempted to paint two M10 with the 17pdr gun for my Flames of War Canadians.  Frustratingly I was not able to get the green to match my Sherman tanks.  I tried several times with no success.  What made it even worse was that I had writen down what colours I used and in which order for my shermans.  Still no luck. 

So the tanks sat at the back of my painting desk for the next year.  I decided to take another crack at them.  I took another look at my painting notes from the shermans...and almost instantly realized my mistake. I was using the wrong shade of green for my highlights.  After that the tanks painting up pretty quickly.

As World War two progressed the allies needed a response to the thick armour plating of German tanks.  The US developed the M10  tank destoryer.  Britain ordered over 1500.  By May 1944 the British replaced the original 3 inch gun with the larger 17 pounder gun.  This greatly increased the penitrating power. 

Within the department of tank design the 17pdr M10 was nicknamed the "Achilles" (this was not used by the troops in the field).  

The M10 remained in service for the remainder of the war by the British, Polish and Canadian armies in Italy and northwest Europe. 

Interestinly, Canadians only painted the 5 pointed star on the top of thier tanks.  They also often  painted the star on an angle to differentiate from their American alies.

Thursday, 29 September 2016

Uncle Roy and the 12th Manitoba Dragoons

Last week, my grandmother's brother, Roy Ormiston, passed away peacefully in his sleep.  I did not really know my great uncle Roy.  I think I only met him a handful of times when I was really young.  The only knowledge I had of him was from the stories my grandmother would tell me during our drives up to my parents' home. 

A little while before he passed my aunt found an interesting article posted on "The Memory Project".  Uncle Roy gave an interview about his experience as a member of the 12th Manitoba Dragoons during World War II.  Until then, I had no idea he had served.  It was a very interesting interview.

I wanted to learn more about Uncle Roy and the 12th Manitoba Dragoons.  There is a lot of information about the Dragoons online and in print.  There is a museum in Brandon, Manitoba (wish I knew that last year during my cross Canada trip).  The museum's staff have put a lot of pictures on their online museum tour.  I contacted the curator to see if he had any information/pictures on Roy's military service (or tips on where I could find some).

I will post more as I learn more.

Kevin

Sunday, 25 September 2016

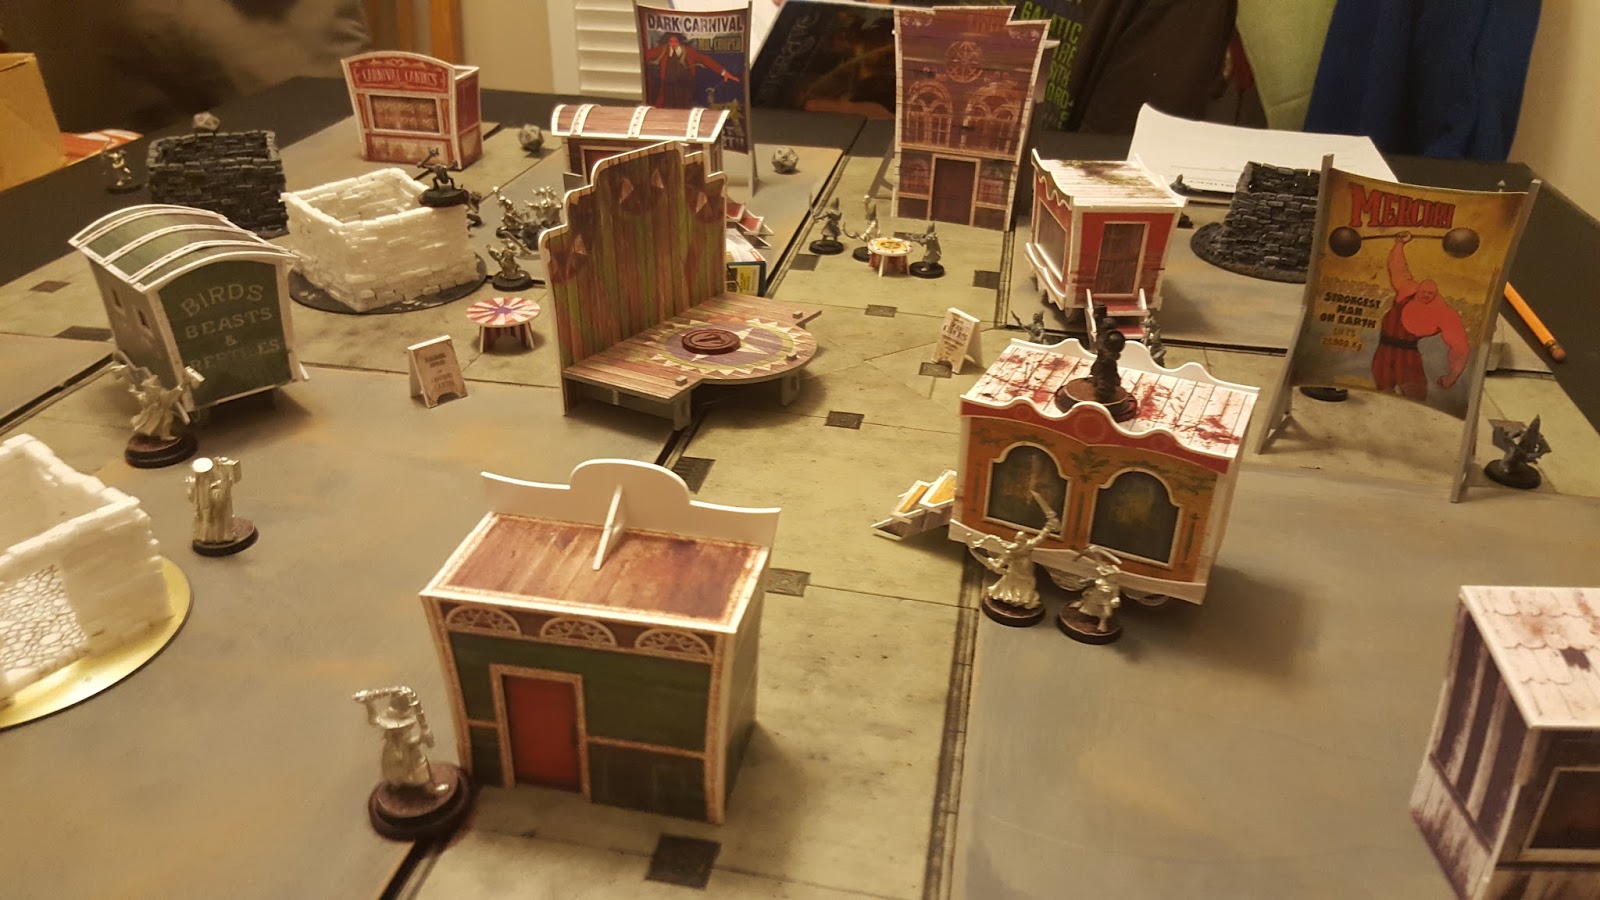
The Dark Carnival

It has been a very busy past few weeks.  We have been in full wedding mode.  Less then two weeks now!

I did get a little time last weekend to work on some new terrain.  I picked up a few sets of the Dark Carnival plastic card terrain.  I really like the look of these pieces.  After the wedding I am planning to build a few more game booth buildings to help fill out the midway.  

Anyone know where I can pick up a model farris wheel?

Kevin


Tuesday, 16 August 2016

Painting Skeletons Remind of Autumn

I finished up all the bases on my Age of Sigmar skeletons late last week.  When they are on round bases they do look more "shambling hoard" like.  I used the PVA glue as the first layer on the bases with these models as well.  Once again it would appear to really help make the cracking much more pronounced.

I had painted these skeletons a few years ago, fairly quickly.  I am planing to take my time on the next models and try some new techniques and different paint combos.  My primary colour will still be purple (But I might have to go back and highlight the purple on the skeletons at a later date).    


Up next will be the five Grave Guard (and maybe some new Batman models...)

Kevin

Thursday, 4 August 2016

The Dead walk

Thank you everyone for the input on my last post.  You made it easy to decide how to base the army.  In the end I went with the popular choice of Moot Green base coat.

I finished up the first unit of 10 Skeletons.  When I rebased the skeletons onto the round bases I used what I had, which was a few solid bases and a lot of slotted round bases.  I did not know at the time how I was going to base the models so I used some tape to cover the gap.  If I went with sand bases there would be no problem.  However with the paint straight on the base I was worried that you would end up seeing a rectangle raised area.


To try and smooth out the transition I gave each base a generous coat of PVA glue to start the process.  I let it dry completely before covering the base in Moot Green.  After that I applied a very thick layer of Agrellan Earth, and let it dry for a few hours.  I applied a thin coat of Biel-tan green wash to the bigger cracks and some Agrax earthshade on top of the Earth.  I then dry brushed on some Tyrant Skull.  Finally finished up with some drying grass and chili flakes for fallen leaves.

What I found was that the bases with the PVA glue coating had a much nicer cracking effect with the Agrellan Earth.  I have since started 20 more bases and had the same success.  Also, no sign of the rectangle of tape!

Without the PVA glue

With the PVA Glue

Kevin

Saturday, 30 July 2016

Trying to Base the Legons of Death

I have finished switching the square bases to round bases for my 1000pts Age of Sigmar.  Now I just have to figure out how to paint the bases.  I did not want to just add some sand and static grass to the bases like I have always done.  I wanted to try something new.

I was talking to Jay again at Lords of War Games and Hobbies and he recommended I try Agrellan Earth Technical paint from Games Workshop.  I really like how Chris at the shop did the cracked mud bases on his Malifaux Guild.

I want to base my models from the Realm of Death, so I am thinking dry cracked earth, dead grass and dead leaves (for a little colour).  Jay suggested using a bright colour underneath the Agrellan earth to give it an other-worldly effect.  I went with a green one since all my ethereal models are green.

This is where I need some help/advice.  I have done up three different bases.  One with a brown base, one with a blight green base, and one with a whitish green base.


 Which base do you think looks better?  Any advice, tips or suggestions would be greatly appreciated.
Rhinox Hide Base

Moot Green Base

Moot Green and White Base
Kevin