Saturday 17 December 2016

Deadshot - Suicide Squad

I finished up the leader for my Suicide Squad, Deadshot.  This was a very smooth and clean model to paint. I tried to spruce up the base with some old Batman newspapers.  The cobble stones are nice but a little plain. 

I am looking forward to trying out the suicide squad.  I have some games lined up for the new year.  It will be interesting playing a team that starts to explode if you mess up (at least if mess up bad enough it will be a quick game).

Up next, cops, Harley Quinn and Batfleck.

Friday 16 December 2016

Katana

The fifth member of my Suicide Squad is complete, Katana.  This was the more difficult model to build in the set.  I had a hard time getting the arms meeting at the wrist and shoulder joints.  Some green stuff helped take care of it. 

I like this version of Katana, she has a lower (for a Free agent) reputation cost and I can use her with my Law Enforcement crew.  She also has the "volunteer" rule, which means that when she is used as a member of the suicide squad she can not be killed by the "suicide squad" special rule (which in turn makes her more reliable then other member who head may go BOOM at the start of the turn). 


Next up will be Deadshot...followed by some cops...

Kevin

Tuesday 13 December 2016

Diablo

Diablo was next on the table.  I actually got him done early into the weekend.  I really liked his skin tone, so I was reserved about trying to paint the tattoos on his face.  However once I finished painting him he just did not look "finished" with out them. 

I added some black lines to the chin and checks for the tattoo skull effect.  I also tried for the little sickle on his forhead.  It was basic but I am happy with it.   I am planning on revisiting the flames in  his hand,  I am  not happy with them.

(I wonder if Knight Models will make a model for giant flaming skeleton with dreads Diablo...)

Monday 12 December 2016

Captain Boomerang

I finished up Captain Boomerang the other day.  I have always kinda liked this villan.  Mainly for the silliness of the character.  He does make a good Green Arrow villan.  The model from the suicide squad has a good Fonzy from Happy Days pose going on.  My squad is coming together.  Squad goals!  I am not sure what that is but I am assured that the young people are using it. 

Sunday 11 December 2016

Suicide Squad

I finished up the first few models from my Suicide Squad box the other day.  First up was Slipknot and Killer Croc.  At the time I painted these guys I had not seen the movie.  Slipknot seemed the easiest out of the group to paint (a little transition from painting nothing but tanks for a few weeks).  The problem with models that are 90% black is that they tend to look a little boring and unfinished.  I was happier with it after I added the buckles and highlights. 

I went with a little more cartoony/comic look to killer Croc.  I have always liked the character.  I especially like him in the Arkham video games.  This one's a little smaller than the latter.  I am also a little surprised that the suicide killer croc is the same strength of every other member of the squad (except Harley, Katana and Slipknot), at 4+. 

I am having a lot of fun painting up these models.  Up next Captain Boomerang. 

Thursday 1 December 2016

Panther and Jagdpanther

I finished up the German Panther from the “Tanks!” starter set while I built my Suicide Squad.  You can build either a Panther or a Jagdpanther from the kit.  I could not decide on which one, so I went with both.  With a few strategically placed magnates I was able to magnetize the hull top and turret. 

One of the reasons the Germans needed the Panther tank was in response to the success of the Soviets T34.  The Panthers had increased armour and a more powerful gun then the Panzer IV.  The Panthers were also cheaper to produce then the larger Tiger heavy tanks.  However the early Panthers where not very reliable any many broke down or caught fire during longer marches.

The Panther was active from mid-1943 until then end of the war.  It was also the third most produced German tank in WW2 (Behind the Panzer and StuG); around 6132 tanks of various models where produced. 

The main armament was a 7.5cm KwK 42 cannon.  The long barrel and large propellant charge created a very high muzzle velocity, which was excellent for penetrating armour.

The Canadian forces faced many Panther tanks during the Battle for Caen in France.  The relatively open ground around Caen was great terrain for the Panthers to knock out allied tanks from a distance.  However by Normandy, 1 in 4 of Canadian M4 Shermans had been upgraded to the 17pdr Sherman Firefly.  There was also an increase in 17pdr M10s.  These allied tank hunters also proved to be dangerous to the Panthers over the open ground.  

One of the biggest concentrations of Panther tanks was during the Battle of Bulge during the Ardennes Offensive.

The Jagdpanther used the same base as the Panther, but removed the turret and embedded the cannon into the hull.  The name translates to “Hunting Panther”, which is fitting as it was primarily used as a tank destroyer.

The Jagdpanther came into service in 1944 and combined the armour and mobility of the Panther with the 8.8cm Cannon of the Tiger 2.  Only around 415 where made, raw material shortages and destroyed factories limited the production.

The British saw only a few of these tanks in Normandy; however a larger number of them were
utilized during the Ardennes Offensive.

Kevin

Saturday 19 November 2016

T34s

T34

I picked up a copy of the “Tanks!” game by Gale Force 9 and Battlefront Miniatures last week.  I really enjoy painting Flames of War tanks and I have a good collection of them.  “Tanks!” seemed like a really good idea.

The game is very simple and quick.  It plays a lot like X-wing or Star Trek Attack Wing. The stat line, upgrades, critical damage and turn flow is virtually the same.  The main difference is the movement, which is simplified. 

I ran through an intro game with a few friends.  We used the suggested encounter battle in the rulebook; 2 American 75mm Shermans vs 1 German Panther commanded by Barkmann.   The guys (who were not miniature gamers) picked up the rules very quickly and after a turn or two did not need me to run very much. 

The game started off very well for the Germans (Panthers are tough as nails!).  All though some “hot” and “cold” dice did come into play (The Americans did not role over a 4 on 15 dice).  The Germans won in the end, but it was a lot closer than expected. 

I found the game had a lot of very dramatic points.  In “Tanks” if you tank is reduced to 0 hull points, you still get to complete the round before you are destroyed (which includes taking one last shot if you had not already done so that round).  As one of the Shermans lost its last hull point, it took one final shot at the Panther.  The shot penetrated the German armour with a critical hit, taking off half of its hull points.

I can’t wait to play again!  In the mean time I figured I would work on some new tanks for the game.  I had some Soviet T34’s lying around, so there was my next project.

The T34 was the most produced tank in WW2; 84 000 were built.  It is arguably one of the most influential tanks ever created.  It was also became the base model that many future tanks were built on.   

The Soviet medium tank was very effective in the early 40s.  It had good slopping armour, a 76.2mm cannon, a reliable diesel engine, and wide tracks.  The combinations of an engine that ran in cold weather and wide tracks made the T34 able to move very well over the “rasputitsa” (sea of mud).  The Germans by comparison had a very difficult time moving their tanks during the soviet “wet months”.  By 1944 many T34s had several upgrades including a larger turret and a more powerful cannon to deal with new German Armour.  These became known as the T43/85 (for the 85mm cannon it now had). 

The soviets were able to mass produce the T34 which allowed them to field large numbers to overwhelm their opponents.  The T34 was such a successful tank that it was still in use in many countries up until the end of the 1980s.      

Thursday 10 November 2016

M10 17pdr

It has been a great and busy few months; family, wedding, honeymoon.  However as life starts to settle down again, I have been able to pick up a brush again.

This time last year I attempted to paint two M10 with the 17pdr gun for my Flames of War Canadians.  Frustratingly I was not able to get the green to match my Sherman tanks.  I tried several times with no success.  What made it even worse was that I had writen down what colours I used and in which order for my shermans.  Still no luck. 

So the tanks sat at the back of my painting desk for the next year.  I decided to take another crack at them.  I took another look at my painting notes from the shermans...and almost instantly realized my mistake. I was using the wrong shade of green for my highlights.  After that the tanks painting up pretty quickly.

As World War two progressed the allies needed a response to the thick armour plating of German tanks.  The US developed the M10  tank destoryer.  Britain ordered over 1500.  By May 1944 the British replaced the original 3 inch gun with the larger 17 pounder gun.  This greatly increased the penitrating power. 

Within the department of tank design the 17pdr M10 was nicknamed the "Achilles" (this was not used by the troops in the field).  

The M10 remained in service for the remainder of the war by the British, Polish and Canadian armies in Italy and northwest Europe. 

Interestinly, Canadians only painted the 5 pointed star on the top of thier tanks.  They also often  painted the star on an angle to differentiate from their American alies.

Thursday 29 September 2016

Uncle Roy and the 12th Manitoba Dragoons

Last week, my grandmother's brother, Roy Ormiston, passed away peacefully in his sleep.  I did not really know my great uncle Roy.  I think I only met him a handful of times when I was really young.  The only knowledge I had of him was from the stories my grandmother would tell me during our drives up to my parents' home. 

A little while before he passed my aunt found an interesting article posted on "The Memory Project".  Uncle Roy gave an interview about his experience as a member of the 12th Manitoba Dragoons during World War II.  Until then, I had no idea he had served.  It was a very interesting interview.

I wanted to learn more about Uncle Roy and the 12th Manitoba Dragoons.  There is a lot of information about the Dragoons online and in print.  There is a museum in Brandon, Manitoba (wish I knew that last year during my cross Canada trip).  The museum's staff have put a lot of pictures on their online museum tour.  I contacted the curator to see if he had any information/pictures on Roy's military service (or tips on where I could find some).

I will post more as I learn more.

Kevin

Sunday 25 September 2016

The Dark Carnival

It has been a very busy past few weeks.  We have been in full wedding mode.  Less then two weeks now!

I did get a little time last weekend to work on some new terrain.  I picked up a few sets of the Dark Carnival plastic card terrain.  I really like the look of these pieces.  After the wedding I am planning to build a few more game booth buildings to help fill out the midway.  

Anyone know where I can pick up a model farris wheel?

Kevin


Tuesday 16 August 2016

Painting Skeletons Remind of Autumn

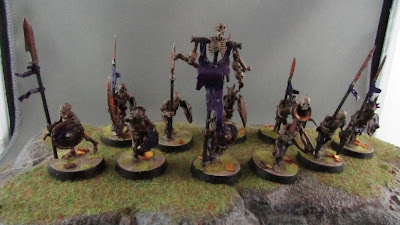
I finished up all the bases on my Age of Sigmar skeletons late last week.  When they are on round bases they do look more "shambling hoard" like.  I used the PVA glue as the first layer on the bases with these models as well.  Once again it would appear to really help make the cracking much more pronounced.

I had painted these skeletons a few years ago, fairly quickly.  I am planing to take my time on the next models and try some new techniques and different paint combos.  My primary colour will still be purple (But I might have to go back and highlight the purple on the skeletons at a later date).    


Up next will be the five Grave Guard (and maybe some new Batman models...)

Kevin

Thursday 4 August 2016

The Dead walk

Thank you everyone for the input on my last post.  You made it easy to decide how to base the army.  In the end I went with the popular choice of Moot Green base coat.

I finished up the first unit of 10 Skeletons.  When I rebased the skeletons onto the round bases I used what I had, which was a few solid bases and a lot of slotted round bases.  I did not know at the time how I was going to base the models so I used some tape to cover the gap.  If I went with sand bases there would be no problem.  However with the paint straight on the base I was worried that you would end up seeing a rectangle raised area.


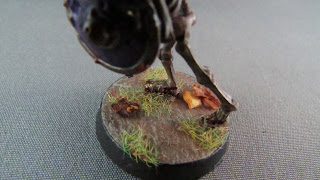
To try and smooth out the transition I gave each base a generous coat of PVA glue to start the process.  I let it dry completely before covering the base in Moot Green.  After that I applied a very thick layer of Agrellan Earth, and let it dry for a few hours.  I applied a thin coat of Biel-tan green wash to the bigger cracks and some Agrax earthshade on top of the Earth.  I then dry brushed on some Tyrant Skull.  Finally finished up with some drying grass and chili flakes for fallen leaves.

What I found was that the bases with the PVA glue coating had a much nicer cracking effect with the Agrellan Earth.  I have since started 20 more bases and had the same success.  Also, no sign of the rectangle of tape!

Without the PVA glue

With the PVA Glue

Kevin

Saturday 30 July 2016

Trying to Base the Legons of Death

I have finished switching the square bases to round bases for my 1000pts Age of Sigmar.  Now I just have to figure out how to paint the bases.  I did not want to just add some sand and static grass to the bases like I have always done.  I wanted to try something new.

I was talking to Jay again at Lords of War Games and Hobbies and he recommended I try Agrellan Earth Technical paint from Games Workshop.  I really like how Chris at the shop did the cracked mud bases on his Malifaux Guild.

I want to base my models from the Realm of Death, so I am thinking dry cracked earth, dead grass and dead leaves (for a little colour).  Jay suggested using a bright colour underneath the Agrellan earth to give it an other-worldly effect.  I went with a green one since all my ethereal models are green.

This is where I need some help/advice.  I have done up three different bases.  One with a brown base, one with a blight green base, and one with a whitish green base.


 Which base do you think looks better?  Any advice, tips or suggestions would be greatly appreciated.
Rhinox Hide Base

Moot Green Base

Moot Green and White Base
Kevin


Wednesday 20 July 2016

Age of Sigmar

It has been awhile, I think I got a little burned out working on those Batman buildings a few months ago and took a little hobby break.  But not un-like the god-emperor Sigmar, I have returned (all be it with far less lightning).

Hows that for a segue?

I have checked out Age of Sigmar before, but I never took the plunge.  Now with the new Generals Compendium, I decided now is the time.  Immediately I was full of nostalgia.  I was sitting in a shop, building an army, looking at the new models, and getting immersed into the lore.  I decided to go with the Forces of Death.  Partly because I have a lot of undead models that where built but never painted, partly because it was my first army.  The very first box of miniatures I bought was a unit of skeletons from Bushmans Games and Comics over 20 years ago.  Time to go back to my roots.

Jay from Lords of War Games and Hobbies was awesome to lend me his copy of  Age of Sigmar source book (as well as a couple of Morgast Archai!)  I wanted to read up on the new mythos.  He also helped me work out a 1000pts army list.  I don't know if it is any good, but it is a start.  

In the middle of switching to circle bases

Kevin

Monday 9 May 2016

Buildings and Henchmen

It has been a few weeks since my last post.  I was doing pretty good there for a bit.  However, in my defense I have been spending most of my free time making buildings for BMG.  Thanks to the help from my soon-to-be-wife (she did lots of the grey stone basecoats), the finish line is in site.

We will be running a beginners tournament at Lords of War Games and Hobbies on Saturday may 14  (See LoWGH event page for details).  So for the last 3 weeks I have been working on some terrain for the event.  Some of the finished buildings I have posted online already.  The goal was 9 buildings of various sizes (3 per table).  I will be putting the finial weathering paint on the last 3 buildings later tonight!  HUZZAH!

So while I wait for the paint to dry, here is the latest henchman.  I finished this model a few weeks ago but did not get around to posting about it.  I had to do some extra putty work on this guys.  I don't know if anyone else has had this same problem (let me know if you have!), but this models head was really misshapen.

It looked OK from the front, but comically thin from the side.  I built up the head (lucky he was wearing a mask) with some green stuff.  I extended the mask to the bottom of the skull to make the sculpting a little easier.  Hopefully he wont stand out on the the battlefield now.  He has also become one of my favorite guys to use in my crew!    


 Hope to see some of you on the 14th!
Kevin

"The harder I work, the luckier I become" Terry Pratchett

Saturday 16 April 2016

Dr. Harleen Frances Quinzel, M.D

I finished up my first sidekick for my Joker Crew. I really liked the classic Harley costume (though the Arkham series ones look great too). I liked painting the split colour costume; should I do a two-face crew? One issue with the model was that I had to base Harley standing on a rock. The handle of her mallet was far too long, I would either have had to cut it down or make her higher.
 
In game, Harley is a bit of a puzzle. With "Acrobatic" and "Fast", she is a very agile model that can jump around the table. I have used this to stalk hiding enemy models, as well as grab an objective early on.

She has the large mallet which is heavy (+1 to wound). It also sends wounded enemies flying backward. However, with her low strength, Harley can be limited in combat. In my last game with her, Harley went after her fellow Gotham City Siren comrade Catwoman. After a few rounds of combat, Harley had barely scratched the cat. Instead, I tried using her in more of a supporting role. I used both "Distract" (-1 enemy defense) and "Discourage" (-2 enemy willpower) on Catwoman.  This dropped Catwoman's high defense down to 4 and robbed her of two key action counters that could have been used to dodge.  This allowed a shotgun wielding henchman to fill the cat full of lead.  Harley Quinn is not as straightforward as she would seem.


I have been following my friend Jay's work on his new Plastic Craft Games terrain pieces.  If you have not seen it, check out some of his work here.  While I was at Lords of Wargames and Hobbies last week, Chris showed me some of the Circus themed Plastic Craft kits.

 They are awesome.  I ended up picking up the "Circus Stage" kit to try it out.  I have also been wanting to make a photo back drop for my Joker Crew for a while.

The kit went together very smoothly, and was a lot bigger then I expected.  For the cost and amount of effort it took to make a nice piece of terrain, I highly recommend it.  I will be definitely be doing a full circus table now.    


Kevin

"The pen is mightier then the sword if the sword is very short, and the pen is very sharp" Terry Pratchett


Sunday 3 April 2016

The Ringmaster - No BATS!

I actually finished up the Ringmaster for my Joker crew late last week.  This models has done well in game.  He has a nice endurance of 7, way above average for a henchman.  He also has the "Unpredictable" trait.  This allows him to spend his special counters as any other counter (and does not count to that actions maximum).  So, the Ring master could put 4 of his action counters in attack and then spend one of his special counters to get a fifth attack dice.  His one down side is an average willpower of 5.


We have started to create a Batman tournament.  We are looking at Saturday in mid May,  More details to follow.

Kevin

"The truth may be out there, but the lies are inside your head" Terry Pratchett  

Sunday 20 March 2016

Joey Bats and his Friend

I finished up two more members of my Joker gang for the BMG. The un-named clown with the shield and Contra-Auguste aka Joey Bats. Hopefully he will swing the bat like the Blue Jays' Joey Bats. Both models are henchmen and have done OK in all their previous games.


I tend to run shield guy in front of the Joker to benefit from the extra "Ping" roll the shield confers. He also has "Demented Laugh (Distract)", which lowers an enemy's defense by one. It just makes it that much easier to the Joker to use that poisoned knife of his when he needs to.


Joey Bats is a little tougher than Shields, and costs a bit more too. With the "Handy" and "Heavy" rules on the bat, he tends to hit and wound fairly consistently. He is great to soak up the opponents defense dice, so someone that can do a bit more damage can land a blow. The "obsessive" (has to go after the first person he damages until they are K.O.) can be troublesome. As of yet, it has not been an issue.

Up next will be the Ringmaster, followed by Harley Quinn...

Kevin

"What he didn't like about heroes was that they were usually suicidally gloomy when sober and homicidally insane when drunk" - Terry Pratchett